Tasks need to be tackled in a logical order to ensure that the bathroom installation proceeds smoothly.
It is very easy frustrating trying to complete one task when all the correct preparations are not complete. To give an extreme example, imagine trying to connect your toilet if the pipework has not already been put in place! I know that's unlikely to happen but you get the idea I'm sure, and there are so many more subtle tasks which if not completed in the correct order will bring work to a standstill.
Plan the job - remove the old fittings - prepare the services - floor, walls and ceiling - install new fittings
Planning.
Have a clear idea of what you want to achieve, ie is this a simple out and in replacement or are there changes being made. If there are changes planned ensure that they will work and that the proposed new layout will fit into the available space. Consider the requirements of any new fittings in terms of water supply and pressure, drainage requirements and any electrical supply needed.
Check that you have all the tools and equipment needed for the job, and any additional materials like timber, screws etc, sealant and glues as well as plumbing materials and any electricals required. Don't overlook safety equipment, with eye protection being very important, but good gloves are worth having too.
Arrange any help you require. You might need help with some heavy items, you might need professional help with plumbing or electrics.
Make sure that you have all the actual bathroom items, floor and wall coverings, mirrors, radiators, lighting and any furniture. Do remember to check that all your fittings are intact and undamaged to avoid problems such as trying to fit a toilet and finding the new one cracked or chipped. Take the time to check everything carefully.
Removing the old fittings.
How this work progresses can depend on exactly what you plan to do, and also what the existing bathroom has in terms of fittings, wall and floor coverings. Your existing facilities in the house are very relevant too, as if you only have the one toilet then your work will need to progress around keeping a toilet facility available for the duration of the installation.
Many people do not remove existing wall tiles, but simply apply the new wall covering over the original tiles. This is actually OK if you are using new ceramic or porcelain tiles, pvc wall panels, laminate panels (or other sheet based coverings) or a composite tile system. However remember that the existing tiles will not exist on the sections covered by the bath, so if the bath is being moved or taken out completely, then there will be a "step" in the wall at this point. You will need to allow for this when installing the new wall covering.
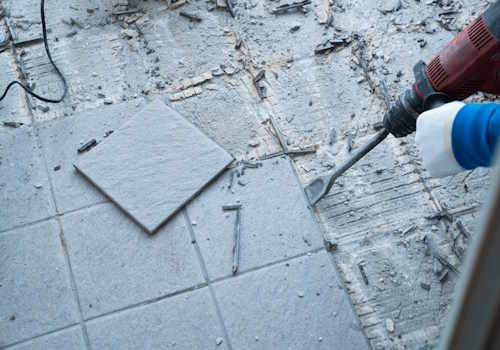
Floor tiles will nearly always need to be removed, as will laminate or other click flooring, and carpets or vinyl can be lifted easily. Laying a new floor over existing tiles will build up the floor level too much and create a step at the door. The one possible exception would be if the new floor is the LVT type. (more detail here)
Read more about wall and floor coverings
Next move is to ensure the water supplies are turned off, avoid a flood at all costs. Hot and cold supplies both need to be turned off and the exact method will depend on your heating system. When the fittings are removed the supply pipes in the bathroom can be capped, allowing the water to be restored to the rest of the house. Any doubts at all, get a plumber.
There may also be electrical connections need in to be made safe, perhaps at a whirlpool bath, a pump, an illuminated mirror, other lighting or heating devices and particularly to an electric shower. This work needs to be carried out by a qualified electrician.
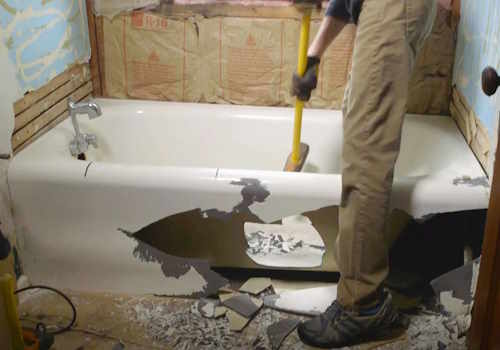
So with all the services turned off the existing fittings can be removed. The basic method for all the bathroom suite pieces is disconnect the hot and cold pipes, disconnect the waste pipe, then remove the wall fixings and off it comes. Pipes can be cut if the old fittings are seized and tight and you can break ceramics off as long as you are not planning to reuse them elsewhere. Be careful of sharp edges, especially on broken ceramics, always wear good gloves and eye protection.
Removing an acrylic or steel bath is fairly simple, but a cast iron bath will be really heavy and require two people. Baths can also be tricky to carry through the rest of the house, where there are stairs and corners, so getting help is a good idea. Sometimes the easiest way to remove a cast iron bath is to break it up with a sledge hammer and remove it in bits.
Given a clear room now we can proceed.
Prepare the services. Also known as First Fix.
This stage is all about making sure that the required plumbing and electrics are available in the correct place for the new bathroom fittings. The exact detail will depend on the actual items you have chosen, but the principal is to bring hot and cold water supplies to where you will have taps or showers, and of course the waste pipes need to be where the waste water will drain out. And always allow for the waste to flow downhill, I know this sounds obvious, but you would not believe some of the disasters I have encountered.
The waste from a toilet is particularly important to get right, a nice downhill gradient and avoid sharp bends. In fact keep bends to a minimum to reduce the risk of blockage.
Installing service valves on the water supply to each fitting is well worth the small extra effort and cost. these will make life so much easier if any maintenance or repairs are needed in the future.
Any required electrical connections need to be sorted now. There might be wall tracking required for electrics and plumbing, it all needs to be sorted now while the room is stripped out.
Read more first fix detail by clicking here.
Floor, Walls and Ceiling.
With the pipework and any electrical supplies in place it is time to begin the actual rebuild, the exciting part when you can see the new bathroom start to emerge.
Usually we start with the floor which will undoubtedly have been lifted in parts during removal and first fix. It could be that there was never any floor below the old bath, and what is there needs careful inspection. Floors around baths and showers are the most vulnerable because of water splashing and possible leaks, and these need checking to ensure they are free from any signs of rotten timber. Any rot needs to be cut out and the remaining timber treated. If the joists are damaged they may require strengthening or even replacing. Damage to the actual floor surface is easy to sort so not too serious. It is not difficult or expensive to replace a few floor boards or a section of sheet flooring.
Flooring which has been lifted for first fix but is in good condition can be re-fitted.
However, before refitting or replacing any flooring, make sure that the water supply has been tested and that the waste fittings have been wet tested too. You don't want to have to lift the floor again to fix a leaking connection!
In some circumstances it is wise to lay some plywood over the floorboards or sheets. If you are tiling this is really essential as it will ensure better adhesion for the tile adhesive, and it will also provide a smooth solid base for a sheet vinyl, however if laminate or other click flooring, or an LVT is your choice, the ply is not so important, but still I would recommend it.
I've been talking so far about timber floors. If you ae a solid (concrete) floor the idea is similar, except you will be filling tracked out sections with concrete mix rather than replacing floor boards. On solid floors, self levelling compound is often required to provide a level smooth finish.
Important Note: If you are planning a wet room, ie a full wet floor, your drainage and flooring installation will be a little different, read more here.
Read more about floor preparation here.
With a decent floor to stand on you can now move onto the walls.
If you have removed tiles then there will be some work required to make a good, level wall surface. A solid (brick or blockwork) wall may need bonded and skimmed. The old tiles will most likely have removed chunks of plaster as you stripped them and this needs to be replaced to provide a smooth surface for the new wall covering. If the damaged areas are deep they will require bonding first to build up the thickness of plaster. When this dries then the finishing plaster can be applied. Areas where the damage is minimal might be fine with a coat of finishing plaster (skim) only.
If you have stud walls (timber studs with plasterboard) then it is likely that the removed tiles have taken areas of plasterboard off. The easiest way to tackle this one is to strip all the plasterboard off and replace it with new. Plasterboard is inexpensive and easy to work with, so completely replacing damaged sections is the best option. There is no need to skim the surface if you plan to use new tiles or any cladding, but if you intend to paint or maybe paper, then the plasterboard will need a coat of skim.
Read more about wall preparation here.
With the walls ready you can now turn to the ceiling.
If you plan to clad the ceiling then it can be left for now, but if it is to be painted then it me need some attention at this stage. If it is in good condition, fine, it can be left, but it might be necessary to patch plaster any areas of damage or in extreme cases replaster the whole ceiling. This in turn might mean reboarding, it all depends on the condition you find your ceiling in.
At this stage your bath and/or shower tray should be installed and connected to the waste pipework. Your bath taps can also be connected to the supply and the bath will now be useable, although with care not to splash!
Read about bath installation here and about shower tray installation here.
Time now to lay your flooring.
Flooring is normally laid just under the bath, enough so that the bath panel(s) will be fitted on top of it, and up to the shower tray. If the shower tray is raised, then flooring can be laid to slip a way below the shower tray. This makes it very simple to work flooring neatly around a curved showertray.
With the floor ready you can turn your attention to the walls. It is time to apply your tiles or cladding, bringing your wall finish down to the bath and/or showertray and sealing neatly. Always use a sanitary grade silicone sealant around the bath and/or tray which will be much longer lasting. Basic silicones may be tempting as they are a fair bit cheaper, but they will discolour more quickly and are much more prone to unsightly moulds.
Read about the wall covering options.
Installing the New Fittings.
As seen above the bath and shower tray will have been installed during the initial stage of the works. Now that the floors, walls and ceiling are finished the remaining fittings can be fitted. Normally the sanitary ware goes in first, the toilet and the basin complete with taps, these can be secured to walls and/or floor and connected to both supply and waste plumbing. The water flow should of course be tested at this point to be certain that everything is working properly and is leak free. If a bidet is being installed or a douche spray, then these should also be connected, secured in place and tested at this point.
Generally if there is a shower valve and head these would be connected and fastened into position, then tested to ensure water flow and temperature settings. Shower valves will often require calibration to set the thermostat so that water is mixed to the desired temperature and the water temperature can be adjusted properly. This can also be a requirement with an electric shower, but it's a simple process which the plumber should be able to complete.
Next would normally be the radiator or heated towel rail. More often these are connected to the household heating system, but can also be electrically operated. If working from the heating system the radiator/towel warmer will need to be bled, a process which expels any air from within and ensures that the heater is filled with heating system water. Sometimes heaters are mainly working from the domestic heating system and have an electrical back up element, often called a summer element. This can provide heat for the bathroom when the central heating is switched off.
Mirrors and furniture will usually be next, particularly any which have light or heater fittings. These can be connected to the electrical supply, mounted in position and tested.
The plumbing and electrical systems should now all be connected and working.
Shower enclosures, doors or wet room panels along with bath panels if you have them will be one of the last jobs. These will be secured in place, any door hinges or rollers adjusted and tested for smooth operation. Sealing neatly around the shower glass with a good quality, mould resistant silicon ensures the enclosure will be water-tight, but do bear in mind that open, walk in style, showers with no door are never 100% water-tight and some splashing will occur through the open entry/exit space. Normally this is nothing to be concerned about and is no more of a problem than when you step out of the shower or bath wet and drip on the floor yourself.
Finally the finishing touches are the accessories which can now be put in place and fastened onto the wall as required.
That's the professional installation complete, the rest is now up to you to add towels, mats, curtains and any other decorative items you want, to bring colour and to emphesise your own personality and style.