Secure the bath carefully so it can't move.
While we are talking about acrylic baths here, these fitting points are relevant also to steel or cast iron tubs, although the cradle and feet might be different with these. Free standing baths are discussed separately.
Acrylic baths, although reasonably rigid, can tend to move slightly, especially because of the steel cradle fixings and the adjustable screw feet. However with a few simple tricks and by taking care, the bath can be made completely firm. Why is this important? Even a small movement of the bath while in use, can through time damage and break the watertight seal around the bath edge and cause leaks.
At this point we are assuming that the first fix plumbing has been completed and the supply and waste pipes are in place.
Before starting the installation ensure that your new bath is undamaged, once you start to work at the bath there can be disputes with suppliers about who caused any damage. It is best to check everything out as soon as you can following delivery.
Step 1
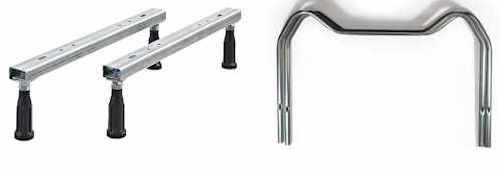
Remove the cardboard packing and look for the fittings box. Open this and check that you have all the required fittings. You are looking for the bath legs or cradle, the adjustable feet (there are usually 4, sometimes 5), fixing brackets and screws. The inner surface of the bath will be covered by a protective plastic film, like a clingwrap. It is a good idea to leave this in place for now to reduce the risk of damage to your bath. You might need to peel this film back around the rim for fitting taps etc.
Step 2
If there are handles or grips supplied with your bath fit these now.
Fit the legs/cradle to the underside of the bath and attach the adjustable feet through the holes in the metal legs/cradle. If there is a center foot and bracket fit it. Be careful to use the correct screws when attaching the legs to the baseboard as too long a screw will go right through and pierce the bottom of your tub. There will normally be screws provided, but take great care at this point.
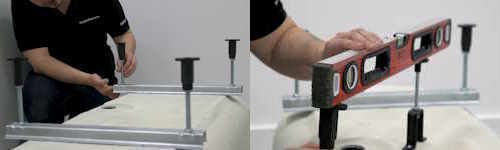
Use a spirit level to adjust all the feet to roughly the same height and hand tighten the lock nuts on the feet.
Step 3
Taps can be fitted now. Many baths will have tap holes already drilled, but if not decide where your taps are to be and drill the holes with a hole cutter. Take care with the hole diameter and the distance that the holes need to be apart. This is vital if you are fitting a mixer tap where the tap holes MUST be a specified distance apart.
If the protective film is still in place on the rim, peel it back from your tap positions before tightening the taps up.
Most acrylic baths have a wooden frame around their edge, below the rim. This can sometimes limit where taps can be positioned, especially if you want the taps on the side of the bath rather than the end. If your bath has an actual tap ledge shaped into the design there should be no issue with the wooden frame, but if the sides are plain drilling side tap holes will break through the wooden frame. This situation is not insurmountable but you will need to take care that your taps can tighten up correctly and that the edge of the bath is not weakened.
Step 4
Peel the protective film back from around the waste and overflow holes. Attach the bath waste fitting and also the overflow, connecting the flexible pipe from the overflow into the waste. Its worth fitting the flexi-tails to the taps now as they may be inaccessible later.
Step 5
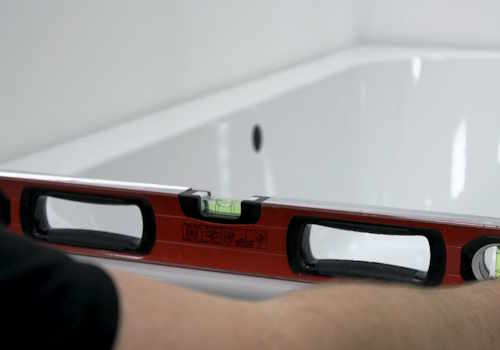
Place the bath against the wall where you want it fitted and check that it is level. Adjust the feet as required to level the bath and tighten the lock nuts on the feet. Use your spirit level to check the bath is level in every direction again, after the feet are locked.
Some people like to fit and level a timber baton to the wall around where the bath will be and use this as a base to set the bath onto. This will ensure the bath is level and will not move, however most of the modern bath fixing brackets supplied today will do a good job on their own. In fact fitting a timber baton will make it difficult to use some of the fixing brackets.
Step 6
Take the bath away from the wall again and mark where the fixing brackets will be. Drill the wall for these (careful to provide adequate grounds if its a stud wall) and if necessary fit the brackets to the underside of the bath (some types need to be screwed into the wooden frame around the rim).
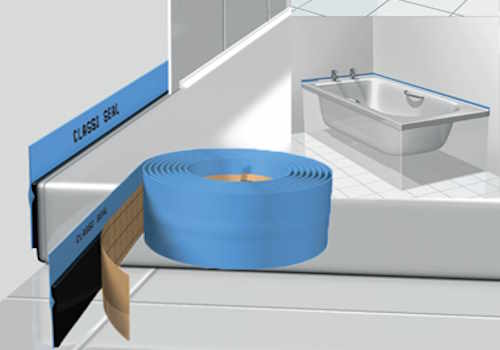
Stick your flexible bath seal onto all edges of the bath which will be set against a wall. This strip will ensure a watertight seal and avoid future leaks, it is well worth the cost, approx £25 GBP.
Step 7
Make sure that the hot and cold feed pipes and the waste pipe are located correctly for final connection. We recommend having a qualified plumber make the connections and any alterations to your pipework.
Lift the bath into its final position, seek help if necessary as two people can do this with ease. The rubber sealing strip should be sticking up above the bath rim and touching against all the walls the bath is in contact with. Make sure there are no kinks in this seal.
Check with your spirit level again to ensure that the bath is still level and when satisfied, fix the brackets to the wall. Give a final check to ensure that the bath has not moved as you tightened the brackets, and that it is still nice and level.
Step 8
Now the flexi tails on the taps can be connected to the hot and cold supply, taking care to connect hot to the hot tap or hot side of a mixer, and cold to cold. The waste can also now be connected, and the water turned back on to fill the bath and test your connections etc.
Your bath is now ready for fitting a panel and finishing the walls behind.