Toilet seats all have similar hinge mechanisms
What varies a little is how the hinges attach to the toilet pan, and this attachment method usually depends on the style of the pan itself.
The good old fashioned open back toilet is by far the simplest of the alternatives. The style of this type of pan means that it is easy to access the seat hinge area from below the pan, so the hinge is generally attached by a long bold which drops down through ledge at the back of the pan and is secured by a nut from below. (see below left) This is often a wing nut which can be tightened up by hand, sometimes a metal wing nut with a washer, and sometimes a plastic wing nut which has a tapered "washer" section incorporated.
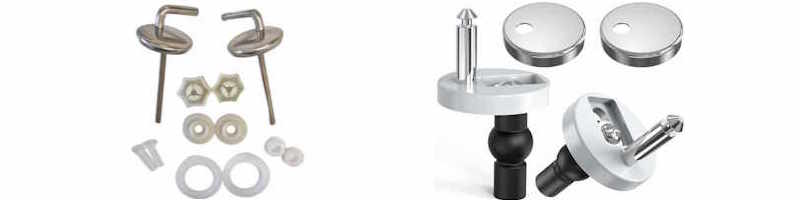
The style of toilet where the pan is enclosed at the back, often called a fully back to wall style, is a little more awkward as the seat hinge cannot be accessed from below when the toilet is installed, so all the attachment and adjustment must be done from above. The modern answer to this is a soft expandable rubber plug with a central brass threaded tube, which is pushed into the two hinge holes on the pan and the seat hinges are screwed into the threaded tubes. (see above right) Thus causes the plug to expand, like a wall plug, and thus locks the hinges in place securely. The added benefit of this fixing type is that, if broken or just worn, the hinges can be unscrewed again leaving the rubber plug in place for refitting new hinges.
Fitting and removing seats:
With the open back pan the hinges are slid into the seat and cover assemble and then the hinge bolts are inserted through the fixing holes on the rim of the pan, and a nut tightens the assembly from below. It's all very simple. The actual hinge bar which attaches to the seat is normally mounted on a circular plate and the fixing bolt drops through a slot across the diameter of this plate. This allows the hinge bar to move all around the fixing bolt to provide forward, backward and sideways adjustment for the seat position.
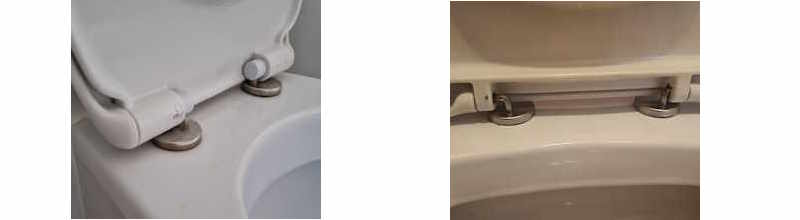
The fully back to wall pan most often now is fitted with a quickly detachable seat, however some older ones will still have a seat and hinge design similar to the open back description above, (see left hand picture above). In the modern models the hinges are normally as the right hand picture above. These fit into the fixing holes on the pan rim and the seat then is pressed down onto the two upward facing spuds and locks into place. The seat can then be manouvered into the best position and the fixing bolts tightened. The seat can then be easily removed by pressing on the button in the center between the hinges which releases the lock and the seat lifts clear off the pan.
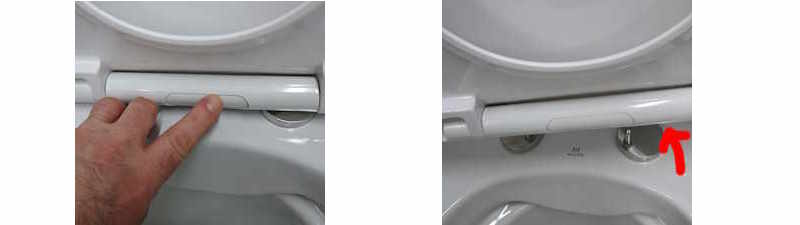
Releasing a quickly detachable toilet seat.
There is a button in the center section of the seat hinge moulding, see image on the left, which will release the seat from the hinge fixing when pushed. Simply push the button in with one hand and pull the seat and cover upwards with the other. The complete seat will lift clear of the two hinge pins as shown in the right hand image above.
If the seat has been in position for a while and never removed, there will be a degree of resistance as the hinge pin will most likely be stuck inside the seat, but a little jiggling and wiggling will usually release the pin and allow the seat to be pulled off. Applying warm water with a sponge or spray will help to unstick the pin, and in extreme circumstances a touch of trusty WD40 should work.
The seat can easily be replaced by positioning over the two hinge pins and pushing gently downwards. You will hear it click into place and it will remain locked until the big central button is pressed again.
With the seat removed it's a breeze to clean the back rim of the pan and to clean the hinge pins and of course clean the whole of the seat and cover.
Tightening the hinge pins.
Each hinge pin is covered by a little cap which can also be removed by pulling upward. Again this might require a little persuasion as they do tend to become stuck, but by gently prising with a screwdriver or penknife blade, the cap will pop off to reveal the fixing screws which hold the hinge pins onto the pan, They can be tightened if the pins are loose and move, causing the seat when fitted to be unsteady. If these pins have been loose they will probably need adjusted into the correct position before tightening fully, and this process is explained below.
Adjusting a quickly detachable seat:
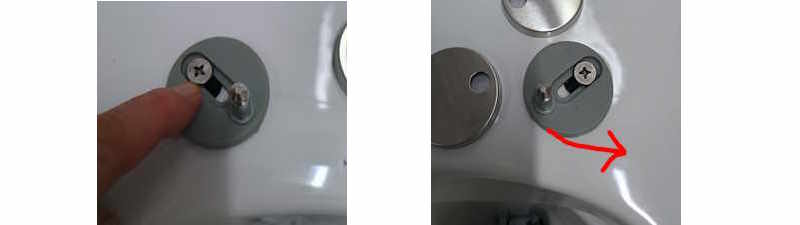
Adjusting the hinge position
This is a fairly simple process, it just requires a little care. The pictures above show the hinge pin with the cover caps removed, ready for adjusting. The caps can be seen in the right hand image. You will notice that the screw is fitted through a slot and the actual hinge pin is fitted eccentrically on the mounting disc. When the screw is loosened the mounting disc can be rotated and also slid up and down relative to the screw, so the hinge pin can be positioned in multiple locations. This mobility allows the seat to be accurately positioned on the pan so that it looks neat and reasonably flush with the rim of the pan all the way around.
To adjust the seat to its best position, tighten the screws just enough to allow the hinge pins to move but not freely. You should be able to push the pins around and slide the mounting disc up and down the screw with a little effort, you don't want them to be loose. So position both pins so that the seat can be attached and attach the seat as described above. You can now move the seat around until it is set to the best position you can achieve on the pan, checking that the line of the seat and cover to the rim of the pan is even all the way around. When the position is right, open the seat up and remove carefully ensuring that the pins remain in position and don't slide off. This requires the seat to be removed gently.
Now carefully tighten the screws up one at a time. Use one hand to hold the mounting disc/hinge pin in place while the screw is tightened up to the point where the disc and pin are secure and can no longer be moved. The cover caps can now be replaced and the seat and cover dropped back onto the hinge pins and clicked into position. When closed the seat should be firmly fixed and neatly positioned on the pan.
Alternative hinge types
Some quickly detachable seats have two release buttons, one for each hinge pin, as seen above left. Release, adjustment and refitting of these is as described above, except the actual release is one of those 3-handed jobs. Another variant which looks similar to the left hand image, has screw fixings instead of push buttons. This type requires unscrewing to release the seat and cover from the hinge pin, and usually this is done with an allen key, the screw normally is recessed into the seat where the push buttons are in the image.
The fixings on the right are what you will normally find on an open back toilet, The hinge pin is horizontal and usually simply pushed into the seat and cover with no screw or spring type securing lock. The principal of the hinge pin mounted eccentrically on a fixing disc however, is the same as for a quickly detachable seat, so the seat will adjust its position in the same way, but the fixing is tightened and secured from below as rthe fixing screw goes through the pan ledge and is secured with a nut (often a wing-nut) from below.