The semi (or half) pedestal can present a few challenges
Plumbing
All pipework, both hot and cold supply and the waste or drainage pipe must be tracked into the wall. If your existing water supply and drainage is coming up through the floor then this will need to be moved back and tracked up your wall to just below basin height.
Usually this is not too difficult, but stone walls will require some major surgery and any internal brick walls can be difficult to track without actually unseating complete bricks and making holes through the wall into adjacent rooms.
Stud walls will make for the easiest plumbing for your semi pedestal basin, so it can make life easy if your design allows for the basin to be fitted onto a stud wall. Of course, where space permits, a section of stud wall can be built for that purpose.
Basin mounting
The basin fixings need to be completely secure as there is no other support provided. The usual fixing method is two hefty (generally 10mm diameter) bolts screwed well into the wall, normally to a depth of 45 to 50mm. the basin will have two elongated holes in the ceramic which these bolts fit through. The metal of the bolt will be shielded from directly touching the ceramic by a nylon grommet and washer, and the basin can be tightened up against the wall with a large nut and metal waster.
see more about semi pedestal basins.
Typical Semi Pedestal Installation:
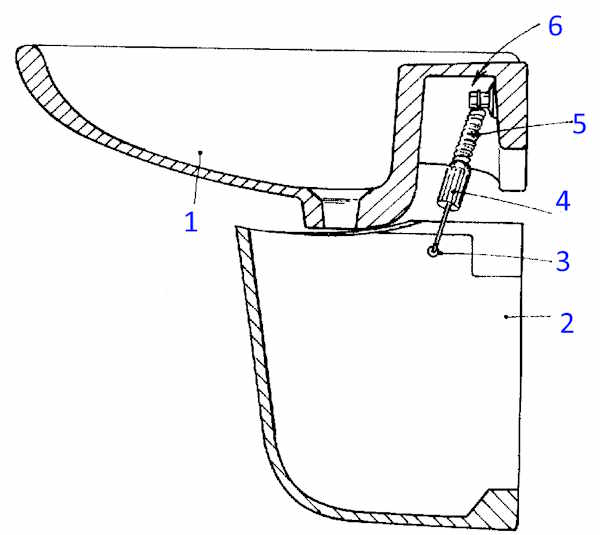
1. Basin 4.Fixing Adjuster
2. Semi Pedestal 5.Spring/Threaded Bar
3. Fixing Hole 6.Wall Mounting Bolt
This diagram shows how the basin (1) is bolted to the wall by the fixing bolts (6). The semi pedestal (2) hangs below and is suspended from the fixing bolts by the spring/ screw hook device. (4 & 5). The basin must be firmly attached to the wall, there is no support at all offered from the semi pedestal.
How the semi pedestal is attached:
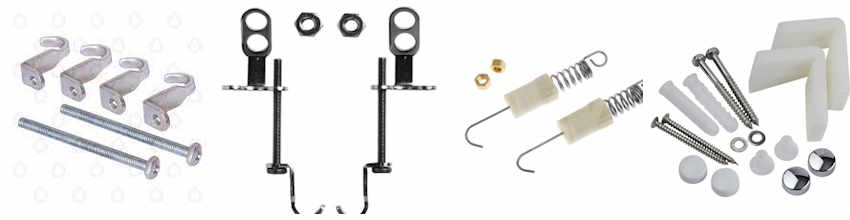
Typical fixings for attaching the semi pedestal.
In the diagram above items 4 & 5 represent the type of fixing shown in the first three images. These are all designed to attach to the basin mounting bolts (6) at the top, with the bottom hook fitting through the fixing hole (3). Thus the semi pedestal is suspended directly from the basin fixing bolts. All these fixings then have a means of adjusting their length and so lift the semi ped up or lower it down into a position where it is fitted snugly against the underside of the basin.
The forth fixing picture shows the variety where the two L shaped nylon blocks (top left) are screw fixed to the wall and the semi ped is then screwed to these through the fixing holes (3). The two chrome (or white) caps can the cover the screw heads to finish off. With this type of fixing there is no room for adjusting the semi ped height once it is screwed in place so fitting this one is really a "get it right first time". The adjustable hook styles are more forgiving.
see more about semi pedestal basins.